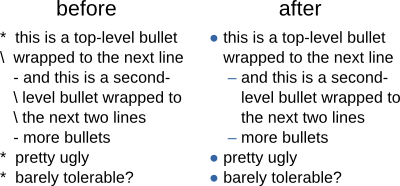
Inkscape is a good open-source drawing program for vector graphics. I'm currently using it to make a research poster, but unfortunately, Inkscape doesn't do bullets. This post discusses your options if you want to use bullets in your Inkscape drawing and introduces a simple Inkscape extension that makes this much easier.
Your first option is to use an external program like Scribus or Tex to generate the bullets and text, then import that into Inkscape. This seems like a lot of work to me. I don't want to flip between different programs or files for this.
The second option is to draw the bullets manually next to your text box. This is pretty time-consuming, but it works if you have just a few bullets to place and your text won't change much. A circle is a sane choice, but you can use whatever you want as a bullet.
The third option is to place Unicode bullets manually inside your text box. To do this, you're limited to using Unicode characters such as bullets, triangles, and dashes. You can find these on the Internet and copy-and-paste these into your text boxes. The main drawback with this approach is spacing: if you wrap your line, you need to insert spacing to indent the next line. The best way to get the same indent level as you had on the line above is to insert the same exact Unicode character as before, but this time make it transparent (or white). This is workable, but it gets really tedious if you have a lot of bullets. It's even more tedious if you want bullets of a different color — in my case, I wanted blue bullets and black text.
I created a simple Inkscape extension to make the third approach more tolerable. The basic idea is to just replace strings in text boxes with bullets and spacing. It's easiest if I just show you:

Every time you run the extension, it applies the following replacements:
| Input | Replaced with | |
|---|---|---|
| * | asterisk space space | top-level bullet |
| \ | backslash space space | indent same as top-level bullet |
| - | space space space dash space | second-level bullet |
| \ | space space space backslash space | indent same as second-level bullet |
Here's how to add this extension to Inkscape. You'll need to create two files
in ~/.config/inkscape/extensions/. The first file,
bullets.inx,
describes to Inkscape how to display and run the extension; it's just
boilerplate. The second file,
bullets.sh,
is the code that gets executed when you run the extension. It needs to be
marked executable. To save these, run:
cd ~/.config/inkscape/extensions/
curl -O https://ongardie.net/var/blog/inkscape-bullets/bullets.inx
curl -O https://ongardie.net/var/blog/inkscape-bullets/bullets.sh
chmod +x bullets.sh
Don't forget to restart Inkscape so it can notice this change.
There's not much magic in bullets.sh. The script just runs sed to
find-and-replace a few strings with Unicode characters of the desired color:
#!/bin/bash

# top-level bullet and space
bullet='<tspan style="fill:#3465a4;">●<\/tspan> '
bulletnext='<tspan style="fill:none;">●<\/tspan> '

# second-level bullet and space
dash=$bulletnext'<tspan style="fill:#3465a4;"> –<\/tspan> '
dashnext=$bulletnext'<tspan style="fill:none;"> –<\/tspan> '

# the last argument to this script is the filename read from
shift $(( $# - 1 ))
f=$1

sed -e "s/\\*  /$bullet/" \
    -e "s/\\\\  /$bulletnext/" \
    -e "s/   - /$dash/" \
    -e "s/   \\\\ /$dashnext/" \
    $f
Here's what the menu item looks like:

And that's it. It's not the prettiest thing in the world, but now you can create bullets in Inkscape without tearing your hair out.